No matching guide yet. Try “quotation”, “payment”, “reminder”, “appointment”, or “checklist”.
START HERE · COMPLETE JOB JOURNEY
From first booking to the next service
Each box opens the guide for that part of the job. At every stage, check the customer name and plate against the actual vehicle or booking before continuing.
Search before creating a customer, vehicle, job or supplier invoice.
Do not move forward until the previous screen shows the correct plate and amount.
A WhatsApp button click is not proof of delivery—check the job’s WhatsApp messages tab.
Print setting: A4 · Landscape · Scale 100%. Put this page at the front desk; keep the detailed guides on the phone or computer.
01 / EVERYDAY TASKS
Create a walk-in job
First find the customer. Then choose their vehicle. A new car does not always mean a new customer.
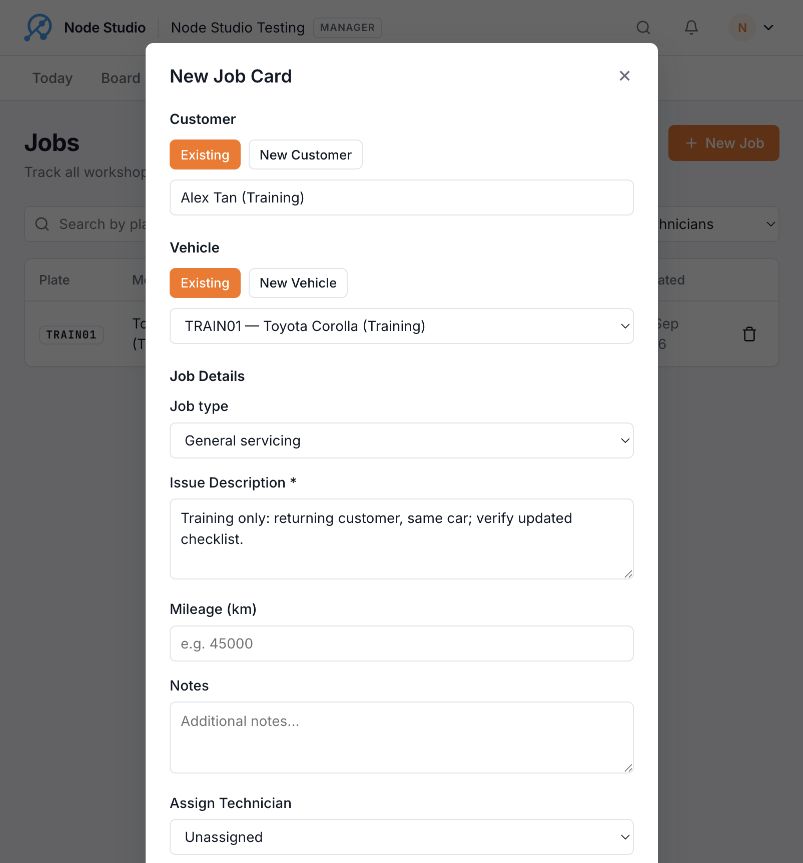
Jobs→+ New Job→New Job Card
Which situation are you handling?
Search customer by name or phone
MATCH FOUND
Select Existing customer
Car listed? Existing vehicle Car not listed? New Vehicle
NO MATCH AFTER CHECKING
Select New Customer
Enter customer details Then enter vehicle details
Check job details → Create Job → Check saved record
Your steps: same customer, same car
Open Jobs → + New Job
In the Customer section, leave Existing selected.
Search and select the customer
Use their name or phone number. Confirm you have the correct person before proceeding.
Select the existing vehicle
Under Vehicle, choose Existing and select the correct plate. If it is not listed, check the customer first; do not select a different car just to continue.
Your steps: same customer, another car
Open Jobs → + New Job
In Customer, choose Existing. Search by name or phone and select the correct customer.
Check whether the car is already listed
Look under Vehicle → Existing. If the correct plate is there, select it instead of adding it again.
Choose New Vehicle if needed
Enter the plate and model. Add the year if known. Keep the existing customer selected—there is no need to create that customer again.
Your steps: a genuinely new customer
Check for an existing customer first
Open Jobs → + New Job. Search by name or phone. A missing plate alone does not prove the customer is new.
Choose New Customer
Enter Name and Phone. Check the country code and number carefully. Add an email only if supplied.
Enter their vehicle
Enter Plate and Model. Add the year if known. Read the plate back to the customer before saving.
Existing customer + existing vehicle. Select the correct customer first, then their car. Tap the image to enlarge.
Finish the job card
Describe the work requested
Choose the job type and fill Issue Description. Add mileage and a technician if appropriate. Fields marked * are required.
Review, then choose Create Job
Check customer, phone, plate, model and requested work together. Scroll to the bottom of the form if Create Job is below the screen. Avoid clicking repeatedly if saving takes a moment.
Check the result
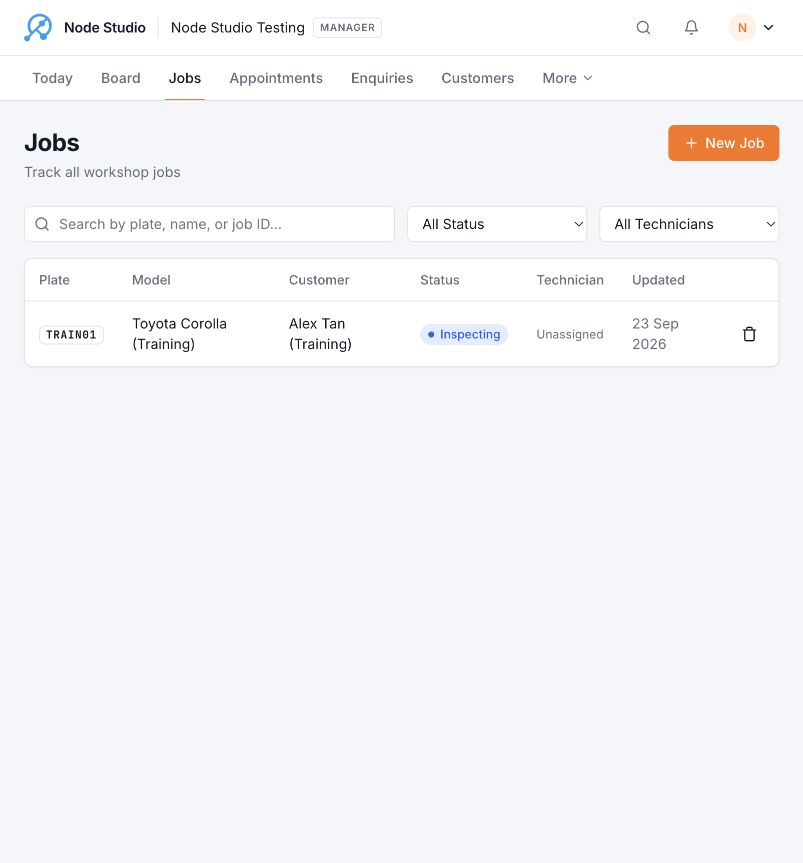
Find and open the saved job. Confirm the correct customer, car and description. If you cannot find it, check the job list before submitting another one.
After saving, the job appears in the Jobs list. The test job started at Inspecting. Click the row to open the job; the plate link opens the vehicle record.
Try it without help
Using a trainer-approved existing customer and vehicle, create one test walk-in job describing an engine-oil service, then reopen it.
Pass: one existing customer, the correct existing vehicle and one job—without duplicate customer, vehicle or job records.
Done correctly when…
The job header matches the selected customer and vehicle.
The job appears on the Board in the expected starting status.
Issue / Complaint contains the requested work.
WhatsApp messages shows Job registered · Sent, or staff have recorded that delivery failed.
02 / WORKSHOP SETTINGS
Change the servicing checklist
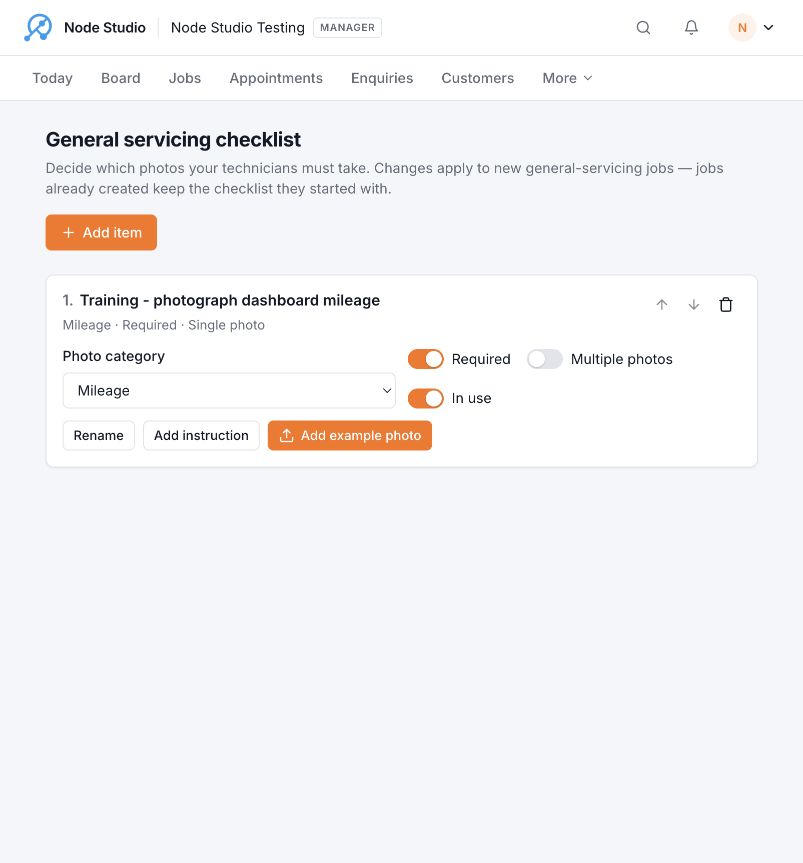
Change what technicians should capture on future general-servicing jobs. This is not the checklist inside one customer’s job.
Where do I go?
Top-right profile menu→Servicing Checklist
If the sidebar is visible, you can also use Settings → Servicing Checklist. The page title is General servicing checklist.
Find the item first. Use Rename for its name, or Add instruction for technician guidance. The top Add item button creates another checklist item.
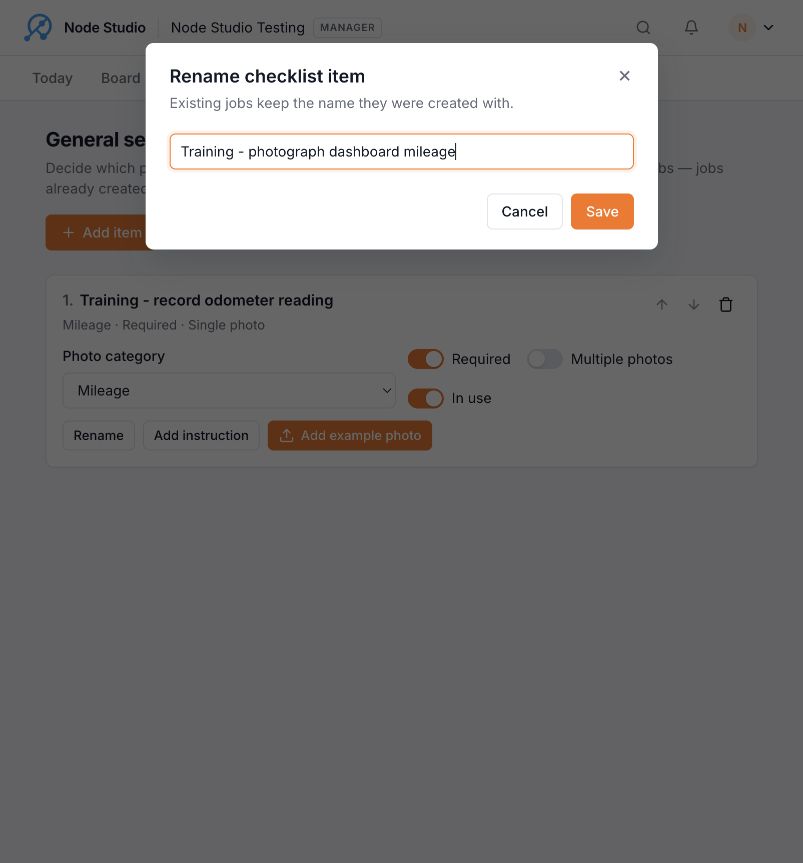
Change the name of an existing item
Check the workshop and find the item
Confirm the workshop name at the top. Locate the checklist item you intend to change.
Choose Rename
Type a short, specific action—for example, “Photograph dashboard mileage”.
Choose Save, then check the result
The new name should appear on the item. Refresh the page and confirm it remains correct. This save-and-refresh sequence was tested in Node Studio Testing.
Save is inside the Rename dialog. Cancel leaves the name unchanged.
Add a new checklist item
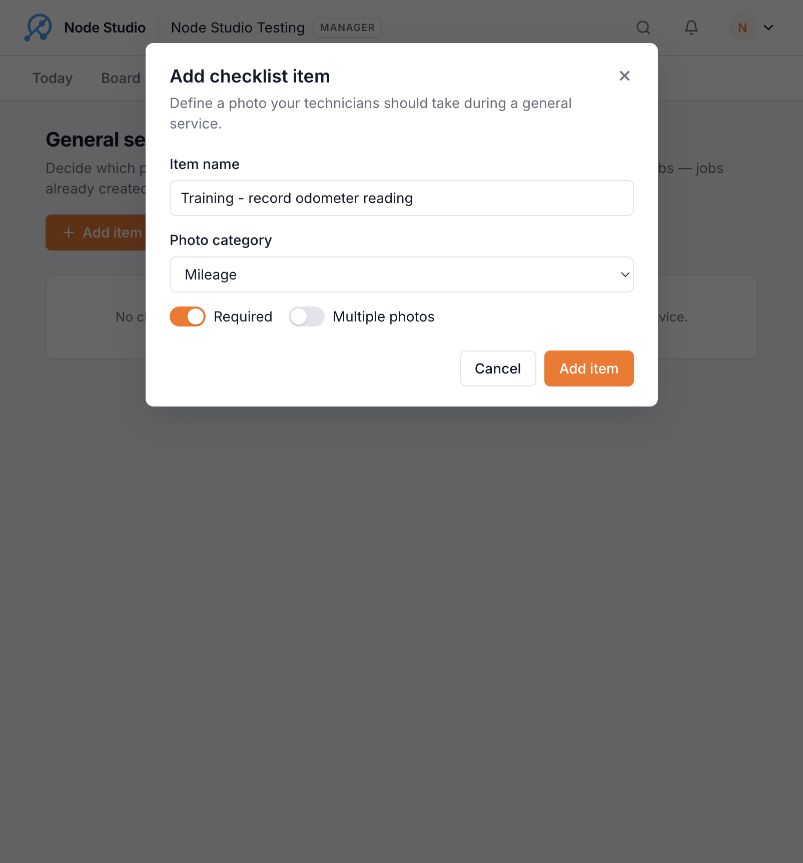
Choose + Add item
Enter the Item name and choose its Photo category. For an odometer image, the training example uses Mileage.
Review the two options
Required starts selected; Multiple photos starts unselected. Set these to match the workshop’s procedure, rather than accepting them blindly.
Choose Add item in the dialog
Confirm the new item appears in the checklist. This creates a template item, not a photo in a customer job.
The example is labelled Training so it cannot be mistaken for a workshop-approved procedure.
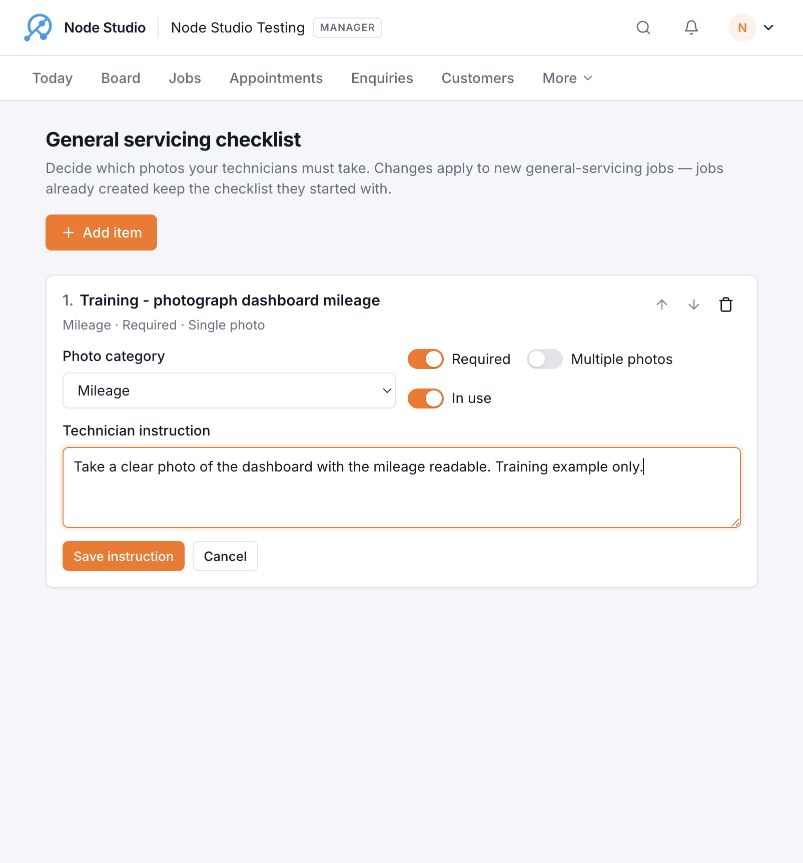
Tell technicians what a good result looks like
Choose Add instruction, enter a short instruction, then choose Save instruction. For example: “Take a clear photo of the dashboard with the mileage readable.”
Use the instruction for the detail; keep the item name brief.
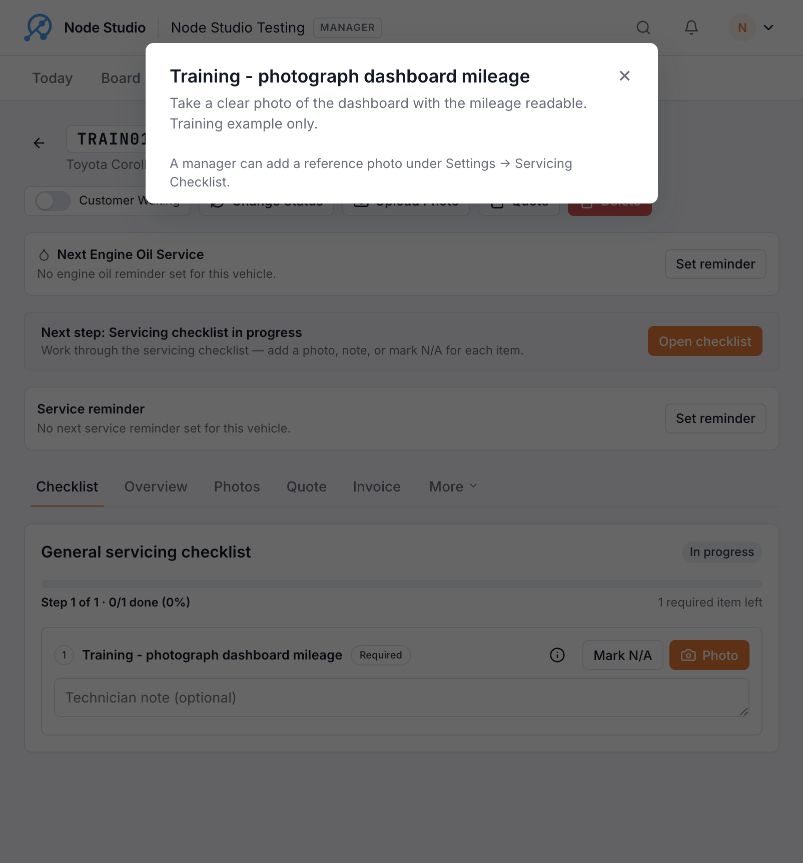
Check it on a new servicing job
Create a new job with Job type → General servicing. Open its Checklist tab. The training test showed the renamed item; opening its help button showed the saved instruction.
Verified result: the new job received the training item and its technician instruction.
Try it without help
Find the trainer-approved test checklist item. Rename that item, refresh and show that it remains saved.
Pass: the correct template item changed, existing jobs were not treated as updated and no real workshop item was deleted.
Done correctly when…
The change is inside General servicing checklist settings—not one customer job.
The renamed or added training item remains after refresh.
Its Required, photo-category and instruction settings are intentional.
A new general-servicing test job receives the item while older jobs keep their original checklist.
03 / BOOKINGS
Book an appointment
Reserve an arrival time for the correct customer and car. A saved appointment is not yet an active job.
Appointments→+ New appointment→Save
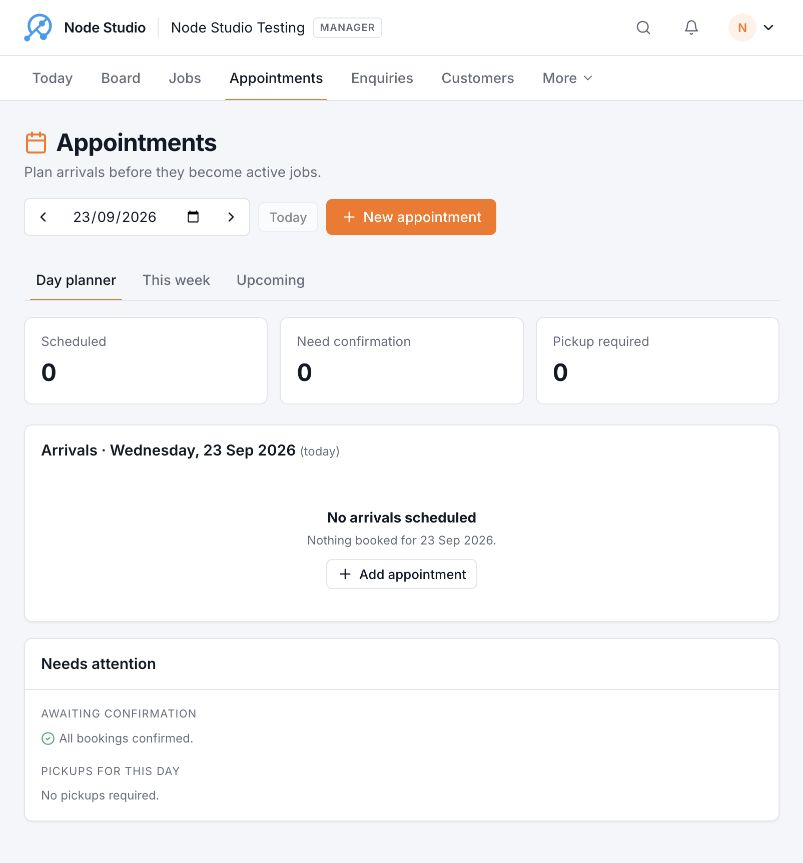
Start here: Appointments in the top navigation, then the orange New appointment button. Check the selected date.
1. Choose the customer and car
Does this customer already have a record?
YES
Customer → Existing
Select the customer from the dropdown. Choose their existing car by plate.
NO — CHECK FIRST
Customer → New
Enter the customer’s name and phone. Enter the vehicle plate.
Returning customer, another car? Keep Existing customer → Vehicle: New
For an existing customer, the vehicle selector appears after you select them. Match the plate carefully. Do not create a second customer just because their car is different.
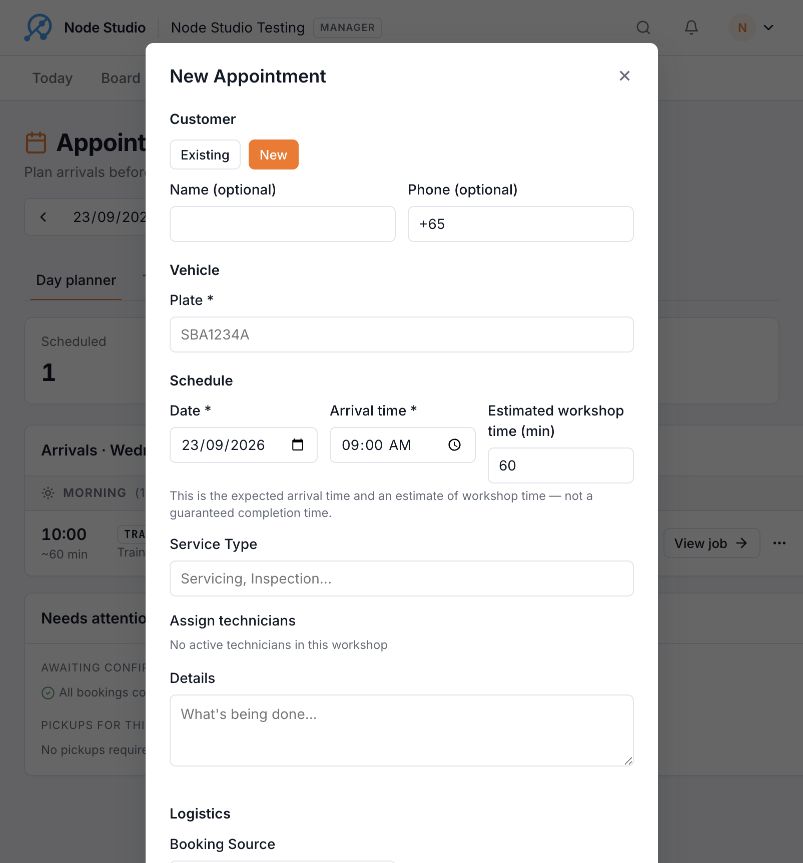
What does the New customer form look like?These fields were inspected without saving another customer. The full save-and-convert test used an existing customer and vehicle.
2. Set the arrival and requested work
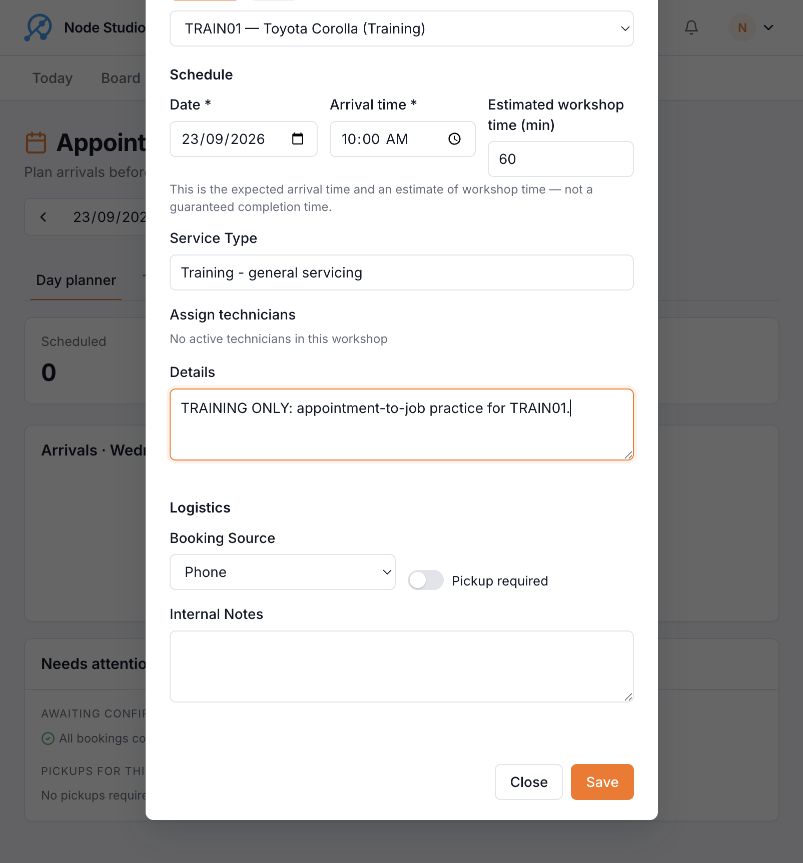
Check Date and Arrival time
Enter the agreed date and arrival time. Check AM/PM if your screen uses a 12-hour clock.
Enter Estimated workshop time
This value is in minutes. The training example uses 60. It is an estimate—not a guaranteed collection or completion time.
Describe the service
Use Service Type for a short label and Details for the work requested. Assign technicians if appropriate and available. The training workshop had no active technicians to assign.
The training example uses 23 September 2026, 10:00 AM and 60 minutes. Use the customer’s actual booking details, not these sample values.
3. Review logistics and save
Choose the actual Booking Source, such as Phone or WhatsApp. Only select Pickup required if pickup is needed. Add Internal Notes if appropriate. Scroll down and choose Save once.
Save is at the bottom. Booking Source describes where the enquiry came from; it does not by itself send a customer message.
4. Find and confirm the saved booking
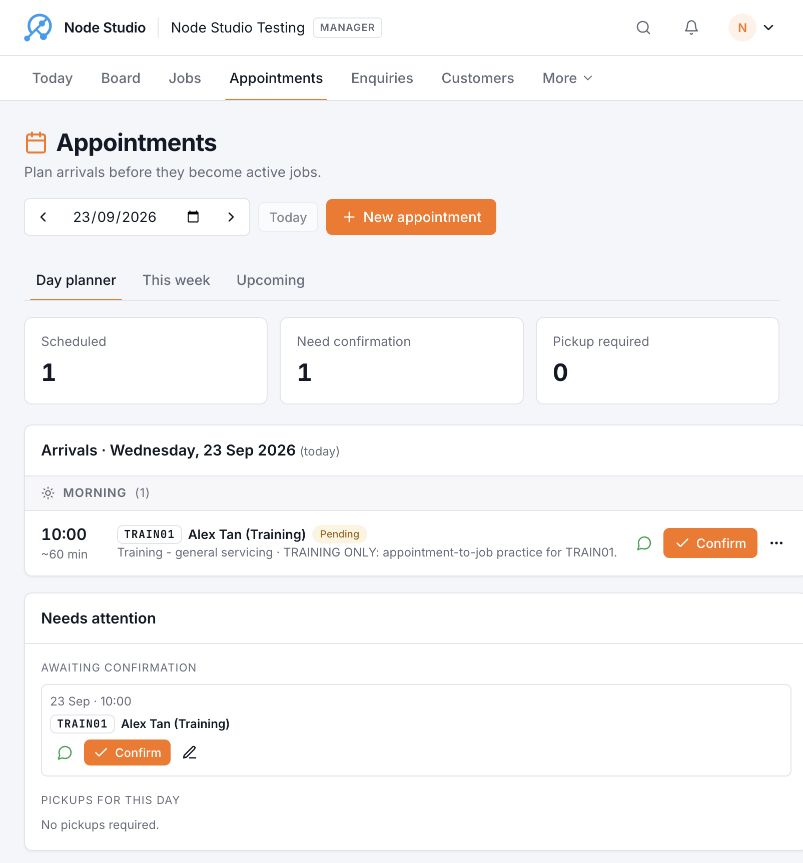
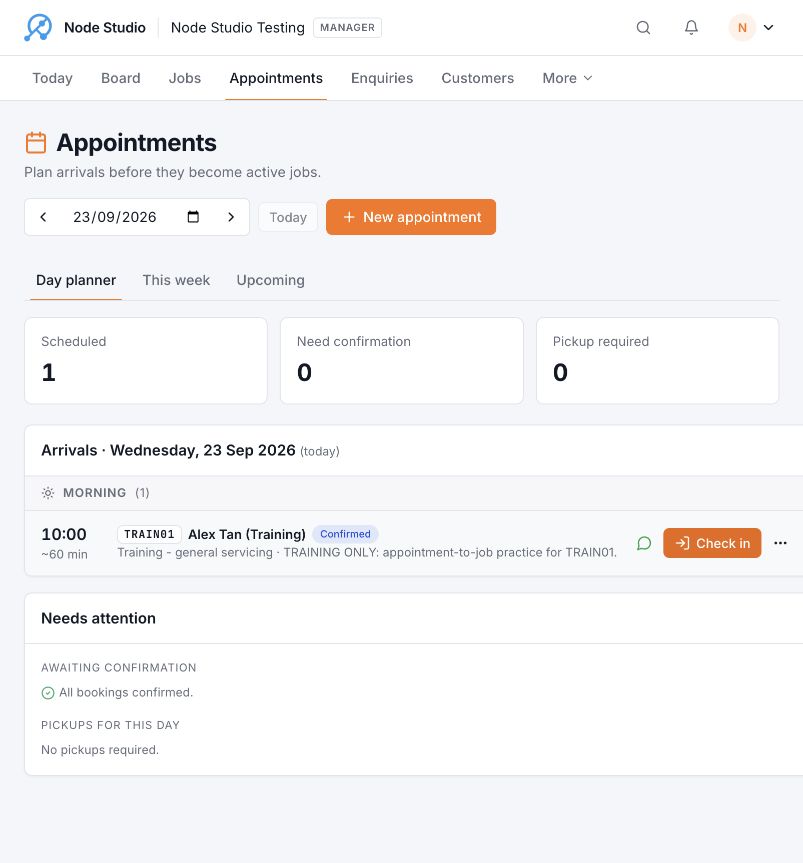
The tested booking appeared in Day planner on its selected date with status Pending. Check the time, plate, customer and service. Use the date selector, This week or Upcoming if you are looking at the wrong day.
Saved does not mean confirmed. The new appointment is Pending and appears under Needs attention.
Once the booking is genuinely agreed, choose Confirm. The tested status changed to Confirmed and the next button became Check in. Do not check in a customer who has not arrived.
Try it without help
Book a trainer-approved existing customer and vehicle for the agreed test time. Find the saved appointment and explain Pending, Confirmed and Checked in.
Pass: date, time, customer and plate match, and no duplicate customer or vehicle was created.
Done correctly when…
The appointment shows the selected customer and vehicle.
The date, arrival time and estimated workshop time match the agreement.
The service details are specific enough for arrival handover.
Only one appointment exists for that agreed visit.
Use the original booking. Check in the arrival, create its linked job, then verify the job details and status.
Find booking→Confirm→Check in→Create job
1. Find the right booking
Open Appointments and choose the booking date. Match the customer, plate and arrival time. If it is Pending, confirm the booking details and choose Confirm. If it is already Confirmed, continue below.
2. Check in the customer who has arrived
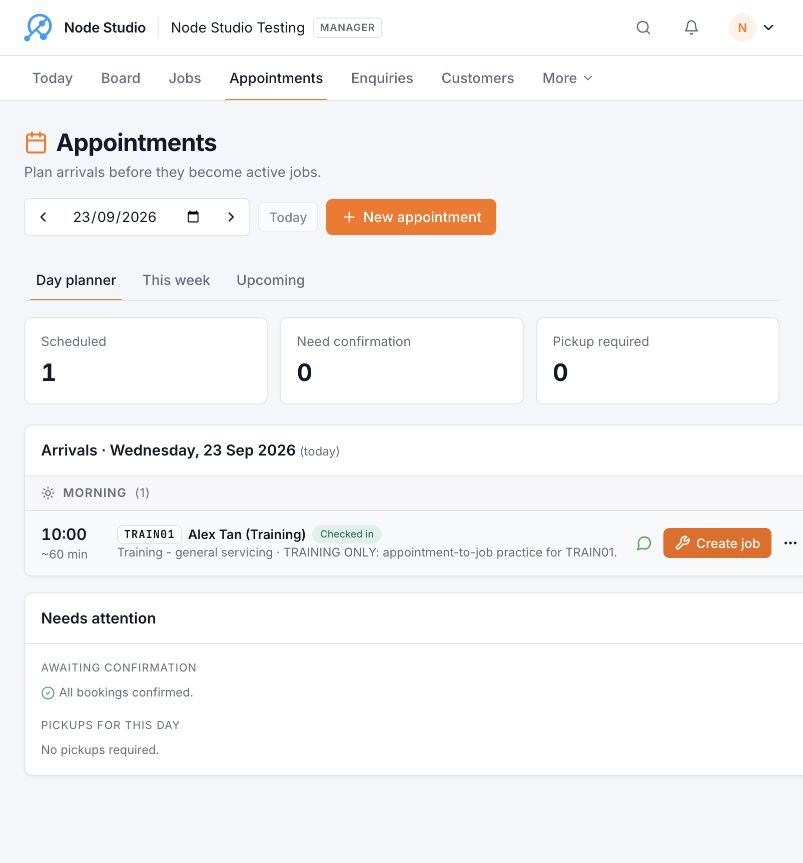
On the Confirmed appointment, choose Check in. Wait for the status to become Checked in.
Check in records arrival. It is not the same button as Create job.
3. Choose Create job on that appointment
After check-in, the action changes to Create job. Choose it once and wait. In the test, Node Studio opened the newly created job automatically.
Create the job from this row. This keeps the appointment connected to its job.
4. Check the job, including its status
Confirm the customer, plate and requested work in Overview. The training appointment’s Details appeared under Issue / Complaint.
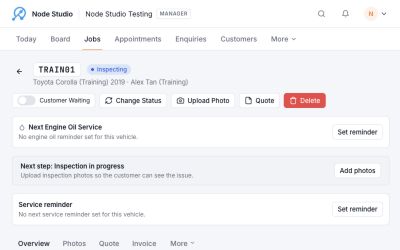
Verified final result after the status update: Inspecting beside the plate. Check your own job’s status rather than assuming check-in updated it.
If the vehicle is present and inspection is starting, choose Change Status → Inspecting → Update. Add a note if useful. Confirm the header changes to Inspecting; this update was tested.
5. Know how to find the same job again
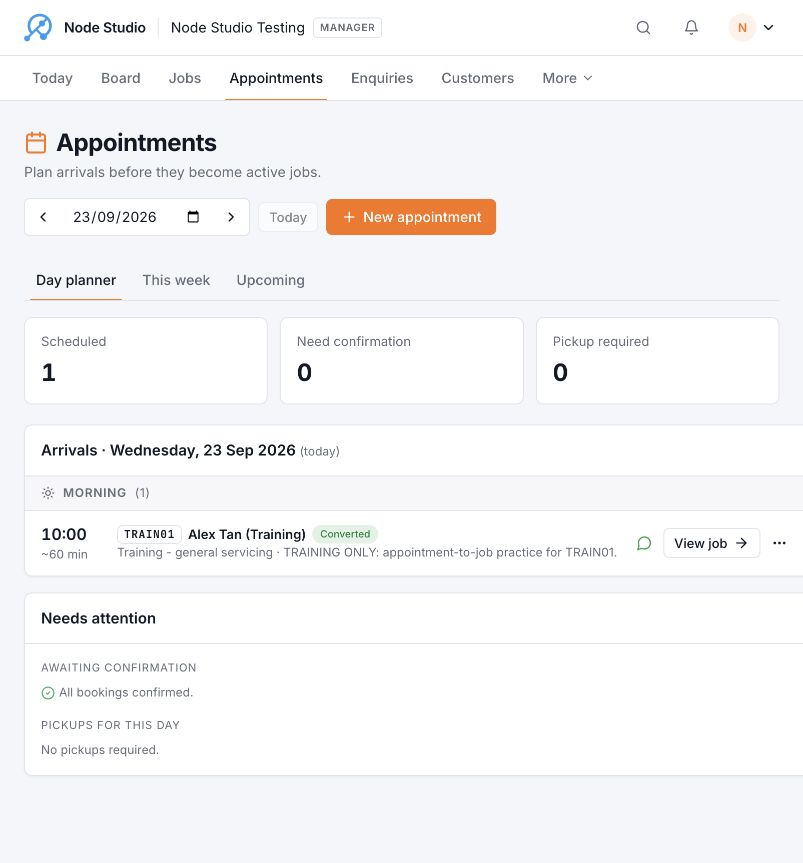
Return to Appointments. The original booking should show Converted and a View job link. That link was verified to point to the job just created.
This is your duplicate check: Converted + View job means use the linked job.
If something does not match
No booking visible: check the date and other appointment views before creating a new record.
Customer or vehicle missing/wrong: stop and correct the original booking via More actions → Edit; ask the manager if the link cannot be resolved.
Click seemed to do nothing: recheck the appointment and look for View job before retrying. Do not create a separate walk-in job to work around it.
Servicing checklist missing: the tested converted job did not display the same Checklist tab as a directly created General servicing job. Typing a service label is not proof the checklist was attached. Ask the manager to verify before using this route for checklist-dependent work.
Try it without help
Use a trainer-approved test appointment: confirm it, simulate arrival, check in and create the linked job. Return to the appointment and use View job.
Pass: correct customer and car, copied work details, correct current status and one linked job rather than a second walk-in job.
Done correctly when…
The appointment shows Converted and provides View job.
View job opens the same customer and vehicle record.
The issue description was copied from the booking.
The Jobs list contains one linked job for that appointment, not a duplicate.
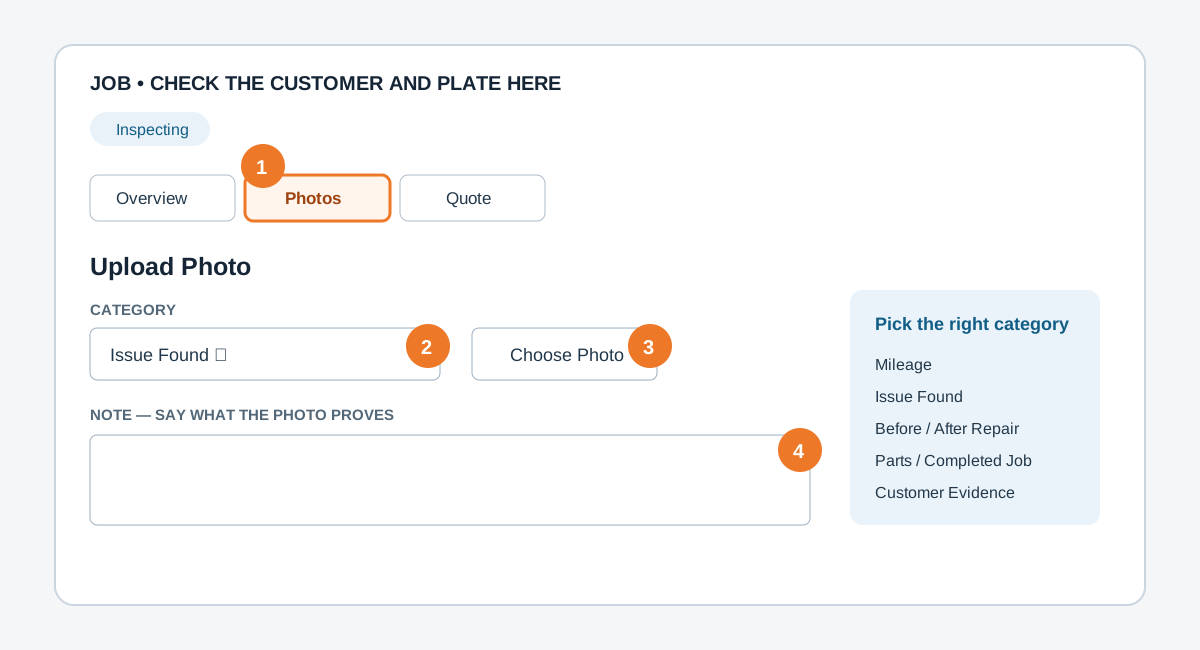
Record what was actually checked and attach clear evidence before the workshop prepares a quotation.
Board or Jobs→Open the correct job→Checklist / Photos
What to look for: 1 Photos tab → 2 category → 3 Choose Photo → 4 useful note. Tap the picture to enlarge.
Confirm the vehicle before starting
Check the customer name, plate, model and issue description against the physical vehicle. Stop if anything does not match.
Use Inspecting while checking the vehicle
The job should show Inspecting. Do not move it to Waiting Approval until the inspection and quote are ready.
Complete the job checklist when present
Open Checklist, follow each instruction and mark only work actually completed. A checklist template applies to new general-servicing jobs; an appointment converted from free-text service may not show the same checklist.
Add useful photos
Open Photos or choose Upload Photo. Select the correct category: Mileage, Issue Found, Before Repair, After Repair, Parts, Completed Job or Customer Evidence. Add a short note that explains what the photo proves.
Check the evidence before handover
Confirm the image is clear, belongs to the correct vehicle and does not expose unrelated customer information. Tell the front desk what requires quotation or approval.
Try it without help
Open a trainer-approved test job. Show which photo category you would use for the odometer, one discovered fault and the finished repair. Do not upload a real customer photo for practice.
Pass: you verify the plate first, choose all three categories correctly and can explain what a useful note should contain.
Done correctly when…
The job header matches the actual customer and vehicle.
The job is in Inspecting while the inspection is underway.
Every required checklist item that exists is completed honestly.
Each uploaded image has the correct category and readable evidence.
06 / TECHNICIAN
Update repair status
The status should describe what is happening now—not what staff hope will happen next.
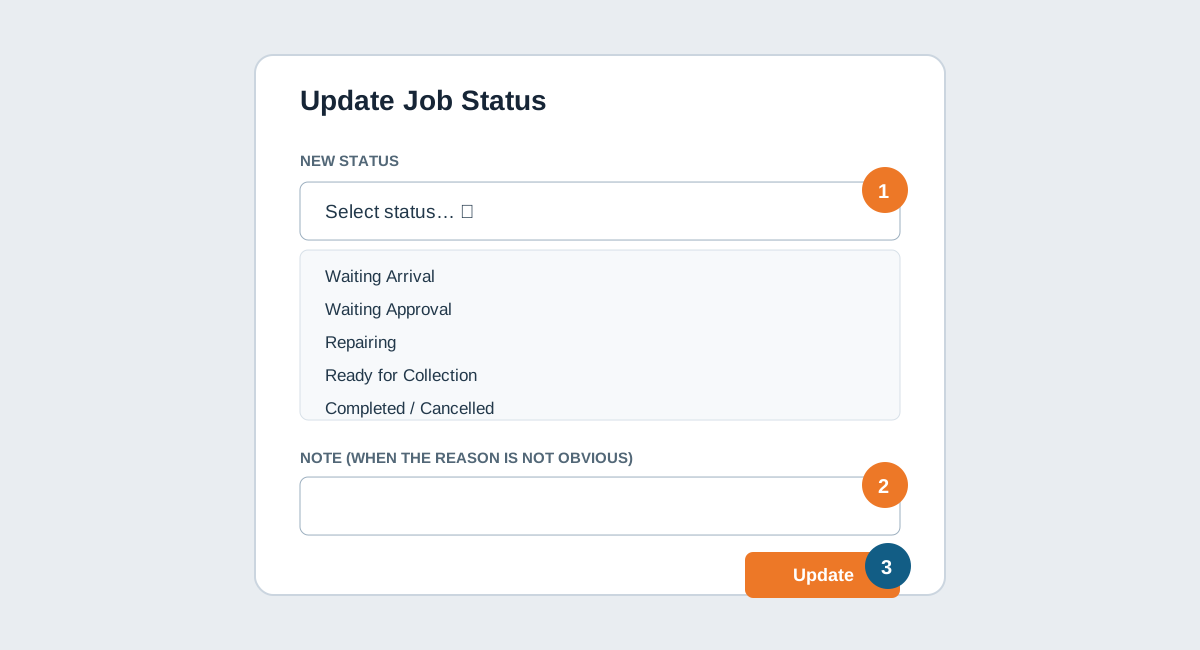
Open job→Change Status→Select status→Update
What to look for: 1 choose the true current status → 2 add a useful note if needed → 3 choose Update once.
What is happening to this vehicle now?
CUSTOMER DECISION NEEDED
Waiting Approval
The quote has been sent and work requiring approval has not started.
AUTHORISED WORK UNDERWAY
Repairing
Use only after approval or for work that does not require additional approval.
Check customer, plate and current status before changing anything.
Choose Change Status
Select the new status and add a useful note when the reason is not obvious.
Choose Update once
Wait for the header and Board to show the new status. Do not click repeatedly.
Check the customer update
Open More job tabs → WhatsApp messages. Look for the matching status update and Sent. A changed status does not by itself prove WhatsApp delivery.
Try it without help
Using a trainer-approved test job, explain when you would use Waiting Approval, Repairing and Ready for Collection. With trainer approval, change one status and verify it on the Board.
Pass: the chosen status matches the real scenario, the Board agrees with the job header and you can find the WhatsApp delivery record.
Done correctly when…
The correct vehicle appears in the correct Board column.
The job header and Board show the same status.
The status note explains any unusual change.
The WhatsApp messages tab shows the matching update as Sent, or staff have recorded that delivery failed.
07 / DAILY MONEY TASK
Build and send a quotation
Itemise only the work being offered, check the total, save the draft and then send the approval link.
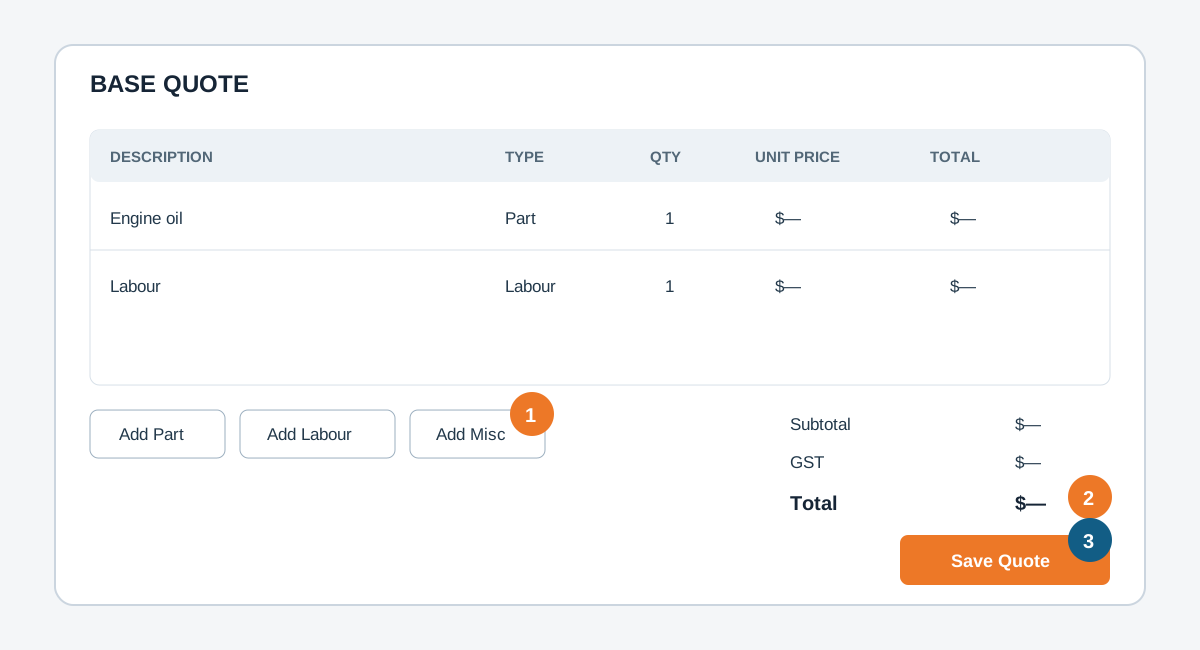
Open the correct job→Quote→Add items→Save Quote→Send for Approval
What to look for: 1 add every part and labour line → 2 verify subtotal, GST and total → 3 save the quotation.
Add each part, labour or miscellaneous charge
Use Add Part, Add Labour, Add Misc or Add from inventory. Enter a clear description, quantity and customer unit price. Internal cost is for authorised workshop roles and must never be copied into the customer message.
Check subtotal, GST and total
Use the workshop’s real tax setting. Do not add GST merely because the field exists. Read every line and the final total before saving.
Choose Save Quote
The quote must be saved before it can be sent. A draft remains editable; sent or approved work should be revised as a new version rather than silently overwritten.
Choose Send for Approval
For the base quote, this moves the job to Waiting Approval, creates the secure approval page and attempts to send the WhatsApp link to the customer’s saved phone number.
Check the customer response
The customer can approve, ask a question or decline. Do not start chargeable repair work until the current quote shows Approved.
WHAT THE CUSTOMER RECEIVES
A WhatsApp message with a secure quotation link for their vehicle.
[Secure approval link]
The page shows the itemised work and total, with Approve Quote, question and decline choices.
Try it without help
On a trainer-approved test job, add one engine-oil line, one oil-filter line and one labour line. Save it as a draft. Do not send it without the trainer’s approval.
Pass: three correct lines, sensible quantities, correct calculation, correct customer and plate, and no internal cost shown as a customer price.
Done correctly when…
The quote belongs to the customer and plate shown on the job.
Every part and labour line, quantity, tax treatment and total are correct.
After sending, the quote shows Sent and the job shows Waiting Approval.
The WhatsApp messages tab shows the quote link as Sent and the customer page shows the same total.
08 / DAILY MONEY TASK
Create and send an invoice
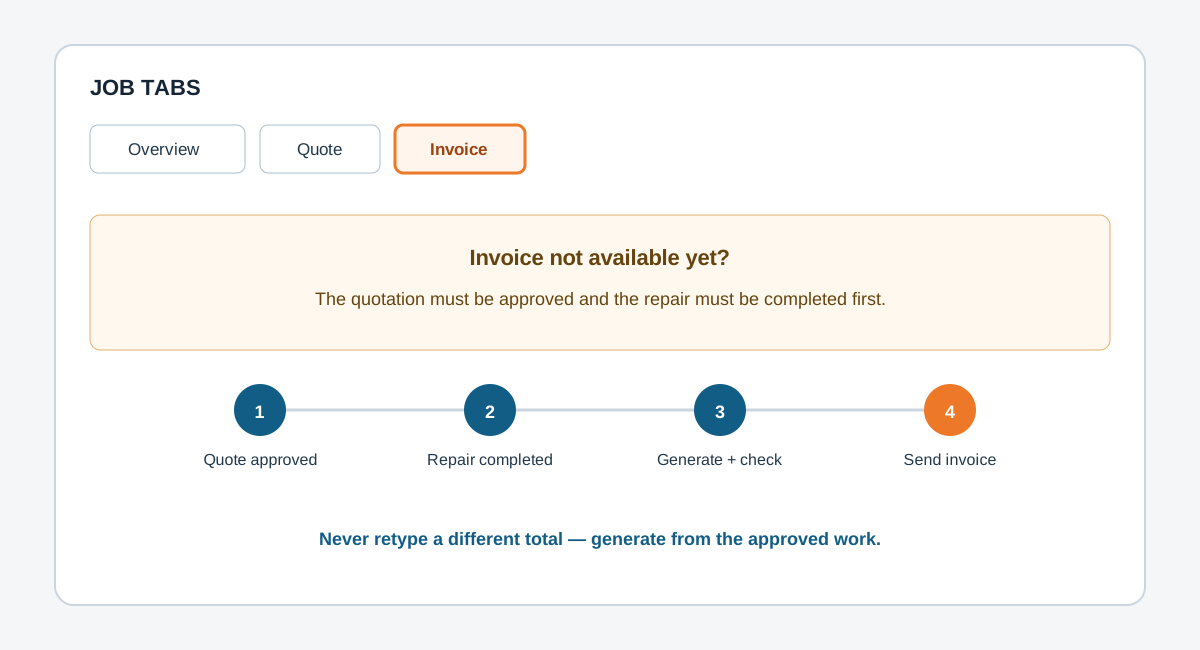
Generate the invoice from approved work—never by retyping a different total.
Quote Approved→Repair completed→Invoice tab→Generate Invoice→Send via WhatsApp
If the invoice is blank: check quotation approval and repair completion first. Do not create a separate invoice elsewhere.
Open the Invoice tab
Confirm the approved quote is the correct version and contains all authorised supplementary work.
Choose the credit term
Select COD, Net 7/14/30/60/90 days or a trainer-approved custom term. The due date affects this invoice only.
Choose Generate Invoice
Node Studio copies the approved items and total. Check invoice number, customer, plate, line items, subtotal, tax, total and due date.
Resolve any changed-total warning
If approved quotes changed after invoice generation, use the invoice refresh control and recheck the payment status and outstanding amount before sending.
Send the invoice
Use Download Invoice as PDF if a file is needed, or Send Invoice via WhatsApp. Check the sent time and the WhatsApp messages tab.
WHAT THE CUSTOMER RECEIVES
A WhatsApp invoice link for their vehicle. The page shows workshop details, invoice number, itemised approved work, total, payment terms and payment status.
Try it without help
Using a trainer-approved test quotation, explain which credit term applies and compare the quotation total with the invoice total. Do not send the invoice during practice unless the trainer approves the test message.
Pass: the customer, plate, line items, tax, total and due date all match the approved work.
Done correctly when…
The invoice belongs to the customer and plate shown on the job.
The invoice total matches all approved base and supplementary work.
The correct credit term and due date are shown.
After sending, the page shows a sent time and the WhatsApp messages tab records the invoice as Sent.
09 / DAILY MONEY TASK
Record a full or partial payment
Record only money actually received. The amount determines whether the invoice remains Partial or becomes Paid.
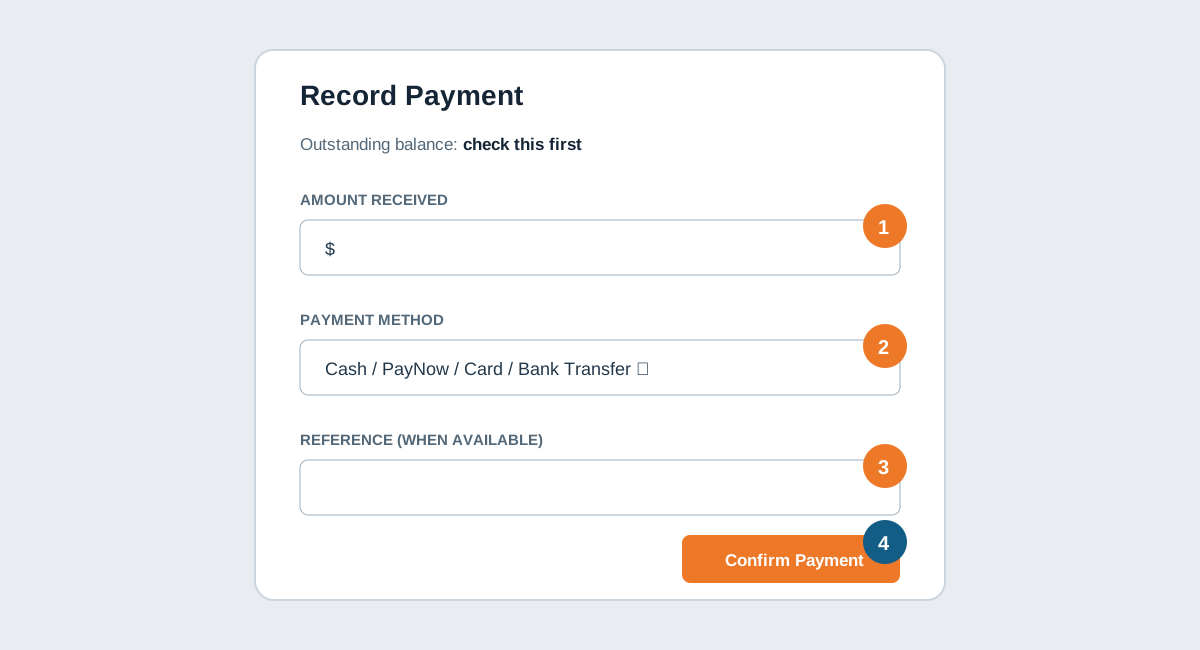
Open the correct job→Invoice→Record Payment→Confirm Payment
What to look for: check the balance first, then enter 1 amount received → 2 method → 3 reference → 4 Confirm Payment once.
Check the outstanding balance
Read the invoice total, amount already paid and balance. Check the customer and plate before entering money.
Enter the amount received
For full payment, enter the exact outstanding balance. For partial payment, enter only the amount received now. Never enter more than the balance merely to make the invoice show Paid.
Select the payment method
Choose Cash, PayNow, Card or Bank Transfer. Add the PayNow reference, receipt number or bank reference when available.
Choose Confirm Payment once
Wait for the invoice to update. A smaller amount produces Partial; payments that fully cover the total produce Paid and mark the job Completed.
Check the balance and job status
For partial payment, confirm the remaining balance is still visible and do not mark the job paid manually. For full payment, confirm the payment summary and Completed status.
Example only: invoice is S$128.00
PARTIAL
Receive S$50.00
Status: Partial Balance: S$78.00
FULL BALANCE
Receive remaining S$78.00
Status: Paid Balance: S$0.00 Job: Completed
Try it without help
Without submitting, use a trainer-approved test invoice and show how you would record a partial PayNow payment. State the remaining balance before pressing anything.
Pass: the amount matches what was received, method is PayNow, the reference is suitable, and the remaining balance is calculated correctly.
Done correctly when…
The payment is attached to the correct customer, plate and invoice.
The recorded amount, method and reference match the money received.
A partial payment leaves the correct remaining balance and Partial status.
Only full settlement produces Paid, S$0.00 balance and Completed job status.
10 / FOLLOW-UP
Set a service or engine-oil reminder
Set the next due point against the vehicle—not against a temporary note or the wrong customer.
Open the correct job→Service reminder / Engine oil→Set reminder
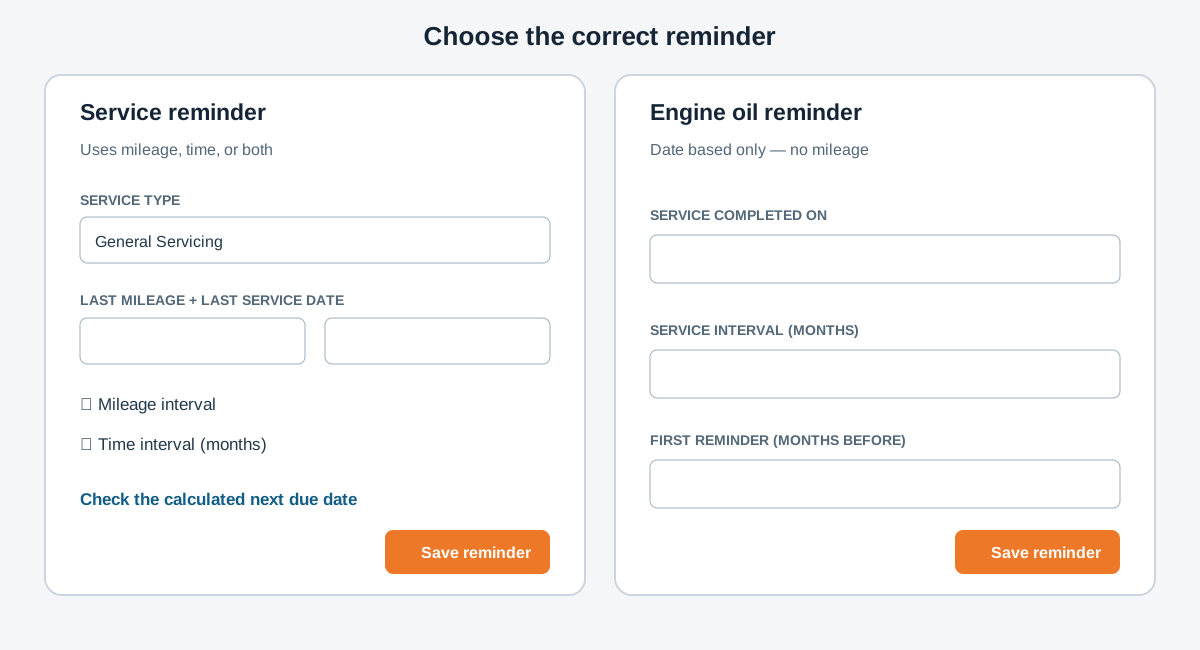
Do not mix them up: general service may use mileage and months; engine-oil reminder uses dates and months only.
Which reminder do you need?
GENERAL SERVICE
Service reminder
May use mileage, months or both. Records service type, last mileage and last service date.
ENGINE OIL ONLY
Next Engine Oil Service
Date based only. Choose service date, interval in months and how early the first reminder begins.
Confirm the customer and vehicle
Reminder cards sit near the top of the job. Check the name and plate before opening either form.
Enter the completed-service information
For a general service, check service type, last recorded mileage and last service date. For engine oil, check the service-completed date.
Choose the interval
Use the workshop-approved interval—not a guessed default. A general service can use mileage, months or both; the engine-oil reminder uses months only.
Read the calculated result
Check the displayed next mileage/date and, for engine oil, the first reminder date. Correct the inputs before saving if the result is wrong.
Save and reopen
Choose Save reminder, refresh the job and confirm the reminder card shows the expected result. The Reminders page should also point to the same vehicle when it becomes due.
Try it without help
On a trainer-approved test vehicle, show where to set a general-service reminder and where to set an engine-oil reminder. Explain which one can use mileage. Do not save without trainer approval.
Pass: the two reminder types are not confused, the calculated dates make sense and both belong to the correct vehicle.
Done correctly when…
The reminder belongs to the customer and plate shown on the job.
The last service date and mileage are accurate.
The interval matches the workshop’s approved schedule.
The saved reminder card shows the expected next date/mileage and no duplicate reminder was created.
12 / ONLINE BOOKING SETTINGS
Manage booking availability and services
Set when customers may request appointments and what they can select. These settings change the customer booking form, so check the result after every update.
If the sidebar is visible, use Settings → Online Booking. This guide covers only Availability and Bookable services; it does not change the booking-link integration or Google review link.
Part A — Change workshop availability
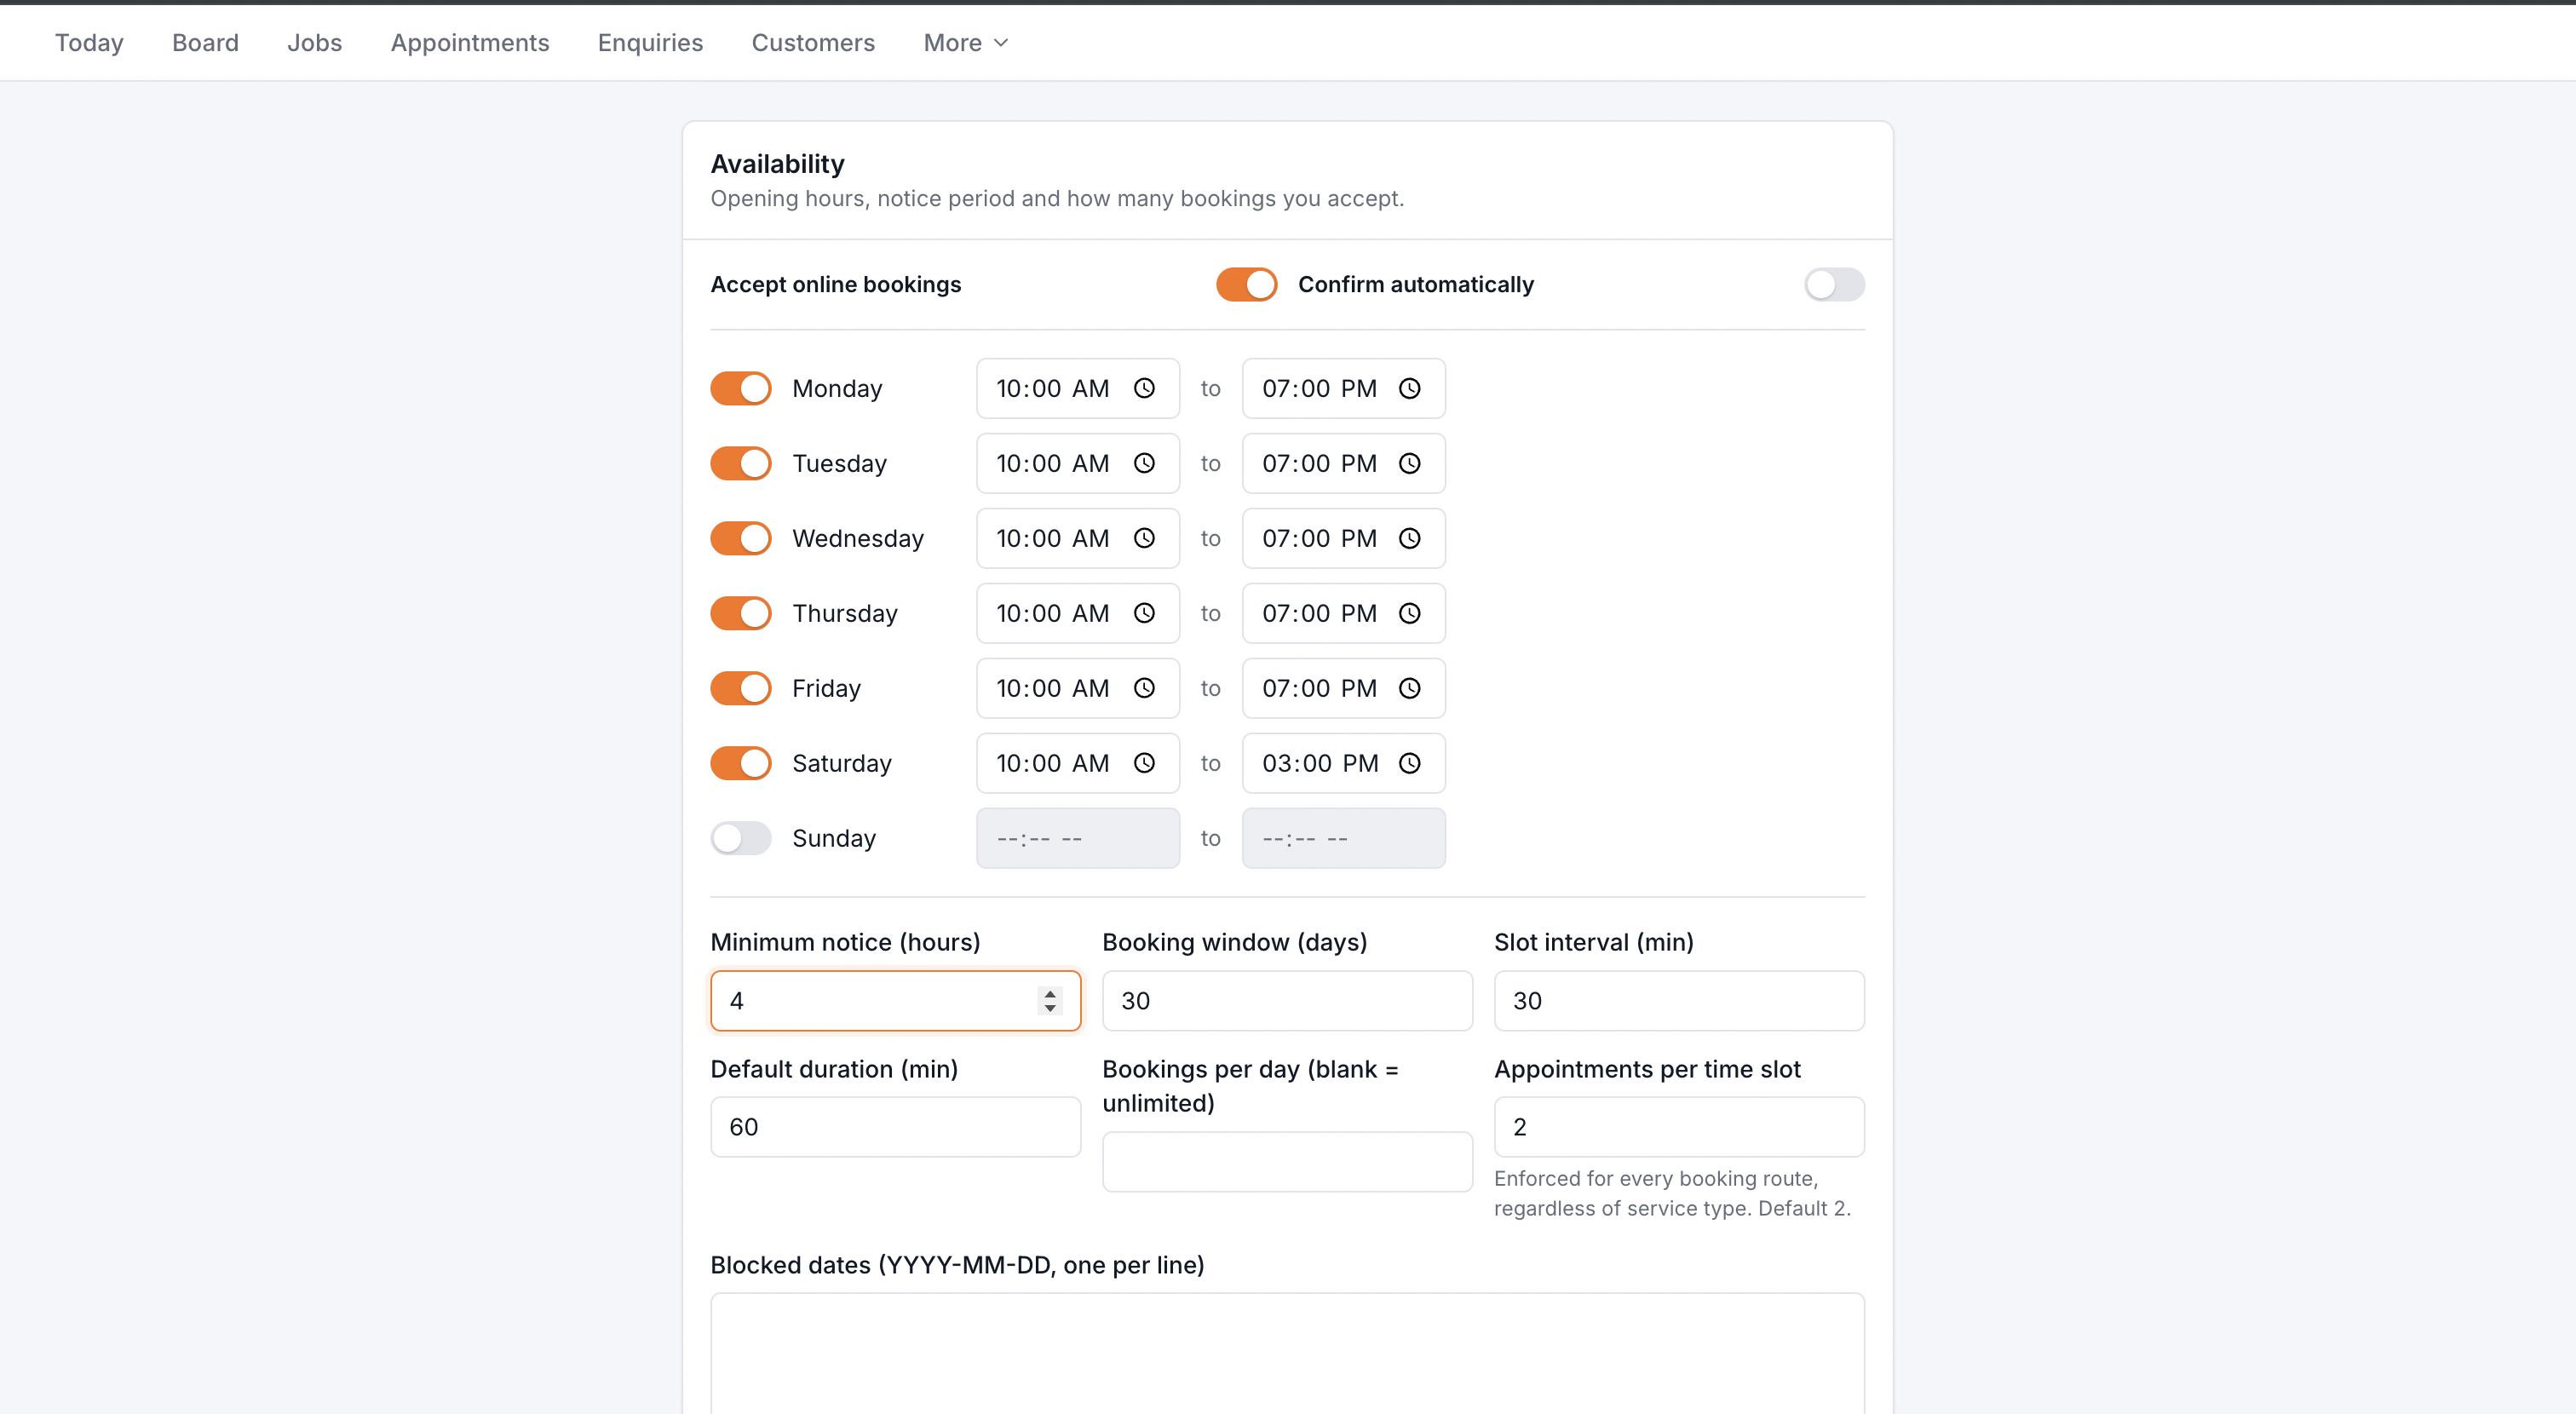
Availability controls what the customer can request. Review the switches, opening days, hours and capacity together before saving. Tap the image to enlarge.
Choose whether online booking is available
Accept online bookings controls whether customers may submit booking requests. Turning this off is a workshop-wide change, not a way to close only one day.
Choose manual or automatic confirmation
Keep Confirm automatically off when staff still need to check workshop capacity, technicians or parts. Turn it on only when the workshop is prepared to honour every slot the system offers.
Set each working day and its hours
Turn on the day, then enter its opening and closing time. Turn the day off when the workshop does not accept online bookings that day. Check AM/PM carefully.
Set notice, timing and capacity
Use the reference table below. Do not increase capacity merely because more slots look available—the values should reflect how many vehicles the workshop can actually receive and manage.
Add exceptional closure dates
Enter each blocked date as YYYY-MM-DD, one date per line. Use this for public holidays, stocktakes or other full-day closures that should not change the normal weekly schedule.
Choose Save availability and verify
Wait for the save result, refresh the page and confirm the same values remain. Then check the customer booking form to make sure the expected dates and times are offered.
What the availability fields mean
Setting
What it controls
Common mistake
Minimum notice
How many hours before a time customers may still book.
Setting it too low and receiving last-minute requests the workshop cannot prepare for.
Booking window
How many days ahead customers may choose.
Opening dates further ahead than the workshop can plan reliably.
Slot interval
How often start times appear, such as every 30 minutes.
Assuming this is the service duration. It only spaces the offered start times.
Default duration
The fallback appointment length when a service does not provide another duration.
Using a duration shorter than the workshop normally needs.
Bookings per day
The maximum number accepted across the day; blank means unlimited.
Leaving it blank without realising there is no daily cap.
Appointments per time slot
The maximum accepted at the same start time, across every booking route and service type.
Setting this above the number of vehicles the front desk and workshop can receive together.
Blocked dates
Full dates that should offer no online slots.
Using the wrong date format or forgetting to remove an outdated test date.
Part B — Add or edit a booking service
Scroll to Bookable services. Only services with Bookable switched on should appear on the customer booking form.
Choose + Add
A new editable service row appears. Give it a clear customer-facing name such as “General servicing” rather than an internal code.
Set the duration
Enter the expected number of minutes. Use a realistic workshop duration because it affects how the booking is represented and planned.
Choose the price type
Use Fixed price only when the workshop can honour the displayed amount for that service. Use Ask for quote when the final price depends on the vehicle, diagnosis, parts or scope.
Check the displayed price or message
For a fixed-price service, enter the intended customer price. For a quotation service, keep a clear message such as “Quote on request”. Do not present an estimate as a guaranteed fixed price.
Control customer visibility
Turn Bookable on only when customers should see and select the service. Turn it off before preparing an unfinished service or temporarily removing it from the public form.
Edit carefully and verify the customer view
The inspected page did not show a separate Save service button beside each row. After editing, click away, refresh the settings page and confirm the values remain; then open the customer booking form and check the name, price wording and duration.
Before removing a service
The bin icon removes the service row. First switch Bookable off and check whether the workshop still needs the service for reference or existing bookings. Do not delete a real service merely to practise this guide.
If customers see the wrong options
No dates available: check Accept online bookings, enabled weekdays, opening hours, blocked dates, minimum notice and booking window.
Too many requests at once: check Appointments per time slot and the daily limit before changing service durations.
A service is missing: check that its Bookable switch is on and verify the customer booking form after refreshing.
A draft service is visible: turn Bookable off immediately, then correct its name, duration and price type.
A request was confirmed unexpectedly: check Confirm automatically and review the appointment record before contacting the customer.
Try it without help
In Node Studio Testing, configure a trainer-approved service called “Training - General servicing”. Keep it non-bookable until all values are checked.
Pass: you explain slot interval versus duration, identify both capacity limits and verify the customer form without exposing an unfinished service.
Done correctly when…
Opening days, hours and blocked dates match the workshop plan.
Daily and per-slot limits match real operating capacity.
Automatic confirmation is intentional.
Only finished, correctly priced services appear on the customer booking form.
11 / SUPPLIER PURCHASES
Scan a supplier invoice
Let the scanner prepare the entry. You still check the supplier, every billed row and the final amount before saving.
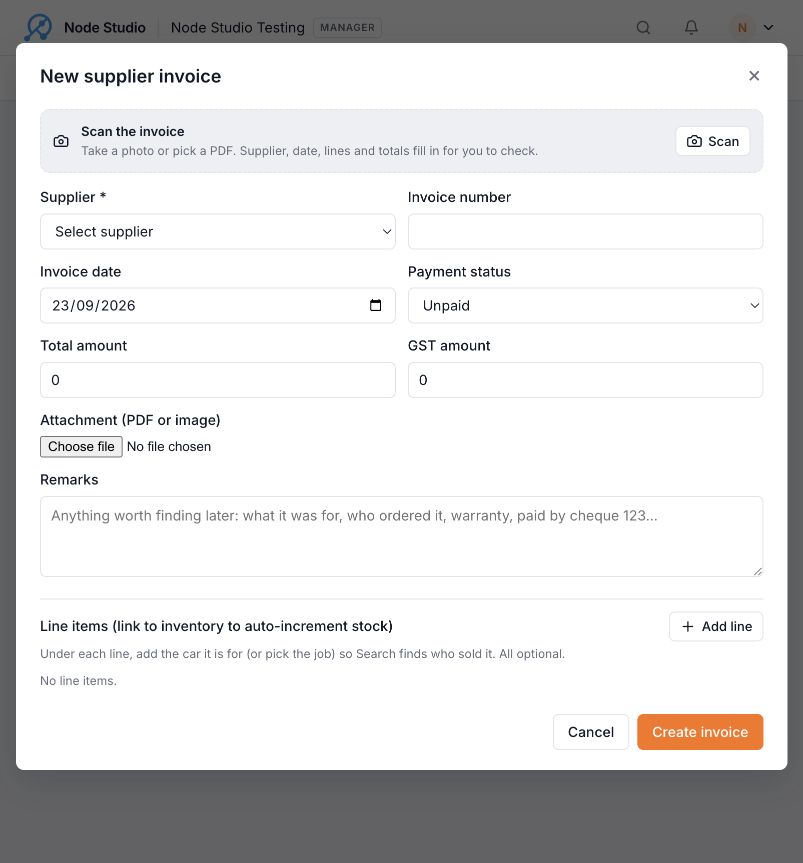
More → Suppliers→Supplier invoices→New supplier invoice→Scan
If the sidebar is visible, use Business → Suppliers. Choose the Supplier invoices tab, not the supplier contact list.
1. Upload a readable invoice
Open New supplier invoice → Scan
Select the invoice photo or PDF. For a photo, include the whole invoice, item rows, discounts, tax and total. Avoid glare and cut-off edges; the original file is preferable to a screenshot with other app controls around it.
Wait for the scan to finish
The button changes to Reading…. The page estimates 10–30 seconds. Wait for a result or error before starting another scan.
Read the result message
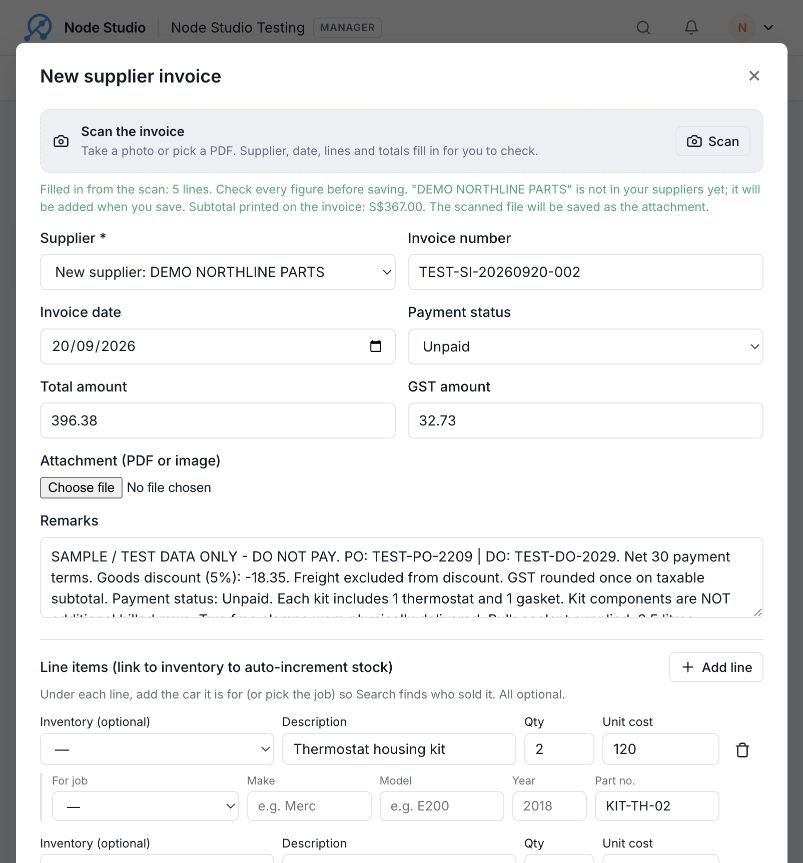
The tested image produced 5 lines. The message also said the new supplier would be added on save and the scanned file would be saved as the attachment.
Use Scan to extract the information. The separate Attachment field is not the extraction button used in this walkthrough.
2. Check the invoice header
Compare Supplier, Invoice number, Invoice date, Payment status, Total amount and GST amount against the source. Edit a field if it is wrong. Do not mark an invoice Paid merely because it has been scanned.
The fictional test invoice was read as S$396.38 total, including S$32.73 GST. These are sample values, not defaults for another invoice.
3. Check every line—not only the total
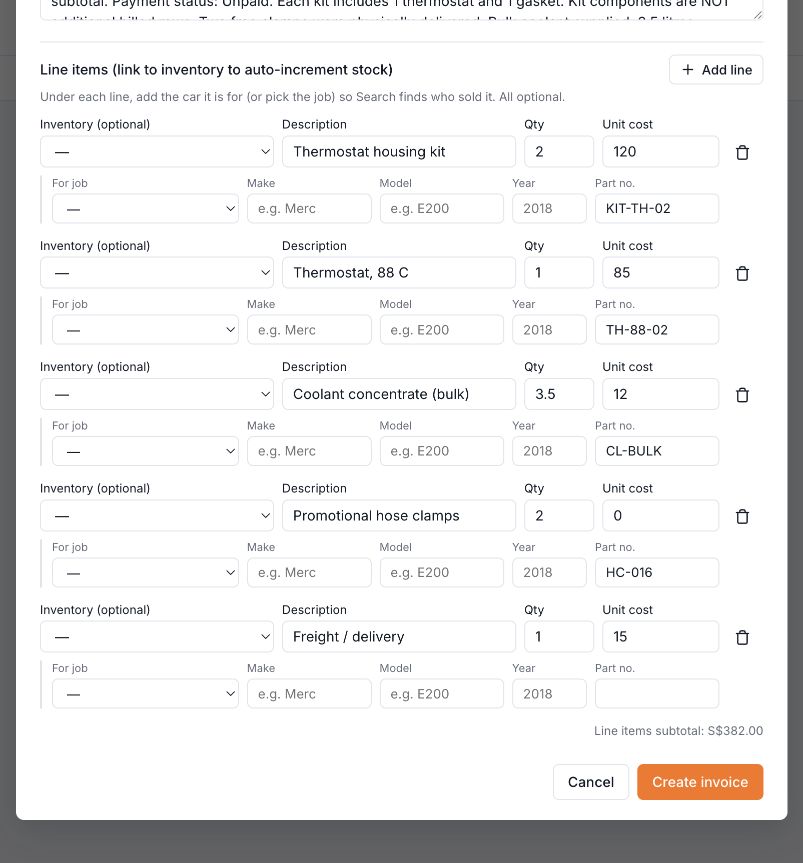
Scroll down. Check each Description, Qty, Unit cost and Part no. A correct invoice total does not prove that its quantities or unit costs are correct.
Keep what was actually billed. The scanner retained the free clamps, fractional coolant quantity and freight, without inventing extra rows for components inside the kit.Practice example: what should the five rows contain?
Billed item
Qty / unit
Unit cost
Before discount
Thermostat housing kit · KIT-TH-02
2 sets
S$120.00
S$240.00
Thermostat, 88 C · TH-88-02
1 each
S$85.00
S$85.00
Coolant concentrate · CL-BULK
3.5 litres
S$12.00
S$42.00
Promotional hose clamps · HC-016
2 each
S$0.00
S$0.00
Freight / delivery
1 charge
S$15.00
S$15.00
The kit already includes its thermostat and gasket. Do not add those as extra billed rows. The separately billed thermostat remains its own row. “3.5” means litres here, not bottles. We added “litres” to the coolant description to make the unit explicit.
For this sample: S$363.65 + S$32.73 GST = S$396.38. The source applies a 5% discount to goods only, not freight, and rounds its sample 9% GST once on the taxable subtotal.
Keep relevant terms in Remarks. No dedicated due-date field was visible in this form, so we added the source due date, 20 October 2026, to Remarks. That is a note—not a verified payment reminder. We also documented the discount reconciliation without changing the printed unit prices.
5. Decide whether to link stock or a job
Do you know exactly where this line belongs?
YES — VERIFIED
Review the correct Inventory / For job choice
The form says an inventory link adds stock. Check the item, quantity and unit first.
NO / NEEDS REVIEW
Leave optional links blank
Do not guess a car from a part number. Do not treat freight as stock.
The training save left all inventory and job links blank. Linking, stock movements and job-cost effects were not tested in this guide. Merely scanning a bill does not establish which customer’s car used the parts.
6. Create the invoice, then reopen it
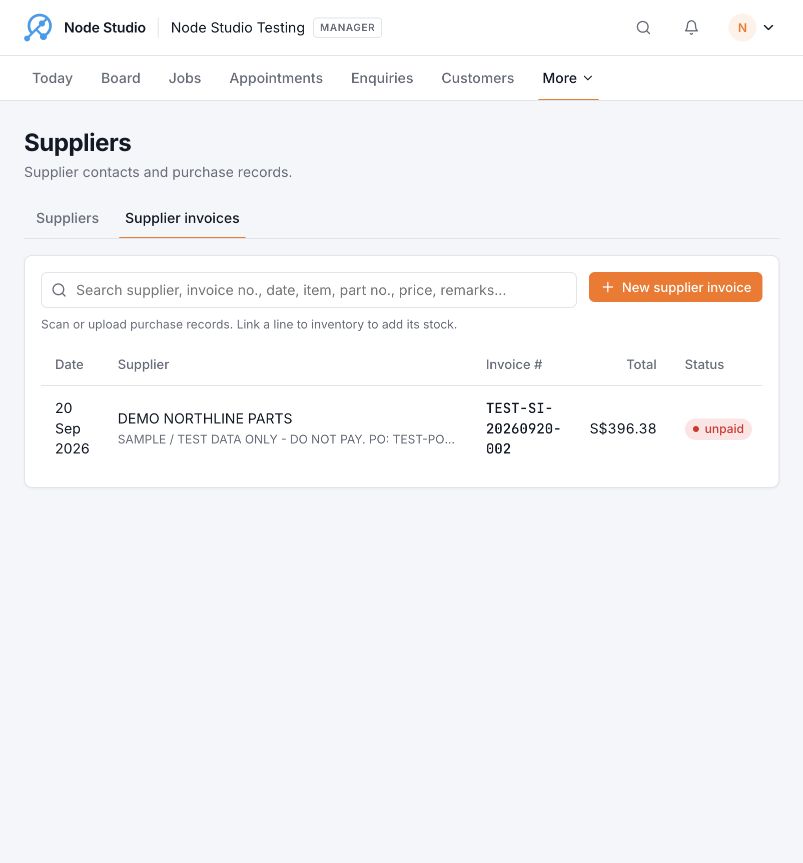
When the source and reviewed entry agree, choose Create invoice at the bottom. Wait for the saved row to appear under Supplier invoices. Check the supplier, invoice number, amount and status, then choose Edit to reopen it.
The test save created the supplier and its invoice. The row showed TEST-SI-20260920-002 · S$396.38 · unpaid.
To find it later, enter its invoice number in the search box on Supplier invoices; this worked for the test record. On reopening with Edit, we verified the five rows, edited coolant description, remarks and totals were retained. A View current attachment link was present. Use it to compare the saved record against the original, rather than uploading the bill again.
If the result is wrong
Unreadable or missing content: use a clearer, complete source image before saving.
Wrong field or row: correct the editable value and compare it again with the source.
Unexplained total mismatch: stop and check discounts, freight and GST; do not force the figures to match by inventing a line.
Existing saved record needs correction: use Edit, not another New supplier invoice. The editor warns that edits re-sync line items and existing inventory purchase movements remain in the audit log; stock-linked edits need manager review.
Try it without help
Review the saved fictional supplier invoice without creating another copy. Explain which verified product row could be linked to a trainer-approved test job and why freight, the discount and uncertain rows should not be guessed into the job.
Pass: five billed rows remain, totals reconcile, attachment is present and only verified paid product cost would feed job profit.
Done correctly when…
The supplier, invoice number, billed rows, discount, GST and final total match the source.
Search finds one saved invoice, not a duplicate.
Freight, discounts and uncertain rows have not increased stock.
Only the verified net paid product cost is linked to the correct job and appears in its cost view.